Mithril Overview⚓︎
Mithril Networks provide the ability to download and bootstrap cardano nodes via snapshots of the the Cardano blockchain. This is a great way to speed up the process of syncing a new node, especially for stake pool operators. The tools provided by Guild Operators are designed to facilitate the ease of use in setting up and managing the:
- Mithril Client to download a snapshot for the given network the node is attached to via the mithril-client.sh script.
- Mithril Signer to participate in the creation of stake based singatures of snapshots via the mithril-signer.sh script.
- Squid Mithril Relay to provide a relay for submitting the snapshots signatures to a Mithril Aggregator, as described in Run a Mithril signer as an SPO documentation via the mithril-relay.sh script.
The env file contains a new environment variable MITHRIL_DOWNLOAD that when enabled
allows the cnode.sh script to automatically download the latest Mithril snapshot if
the local db directory is empty. This is useful for new nodes that need to be
bootstrapped with the latest snapshot to avoid synchronizing the entire blockchain
from scratch. While also providing a high level of trust that the snapshot is valid
since it is signed by multiple pool operators.
Architecture⚓︎
The architecture for Mithril Networks is described in detail at Mithril network architecture by CF/IOHK. However the architecture suggested and supported by the Guild Operators tools is not identical to the upstream documentation in that we provide a more simplified approach to the setup and management of the Mithril Network components and tools that allow setting up a Squid Mithril relays and an Nginx loadbalancer (aka sidecar) local to the Mithril signer. The Nginx sidecar provides the ability to loadbalance requests to multiple Squid based Mithril Relays running on each of the SPO's Cardano Relay nodes.
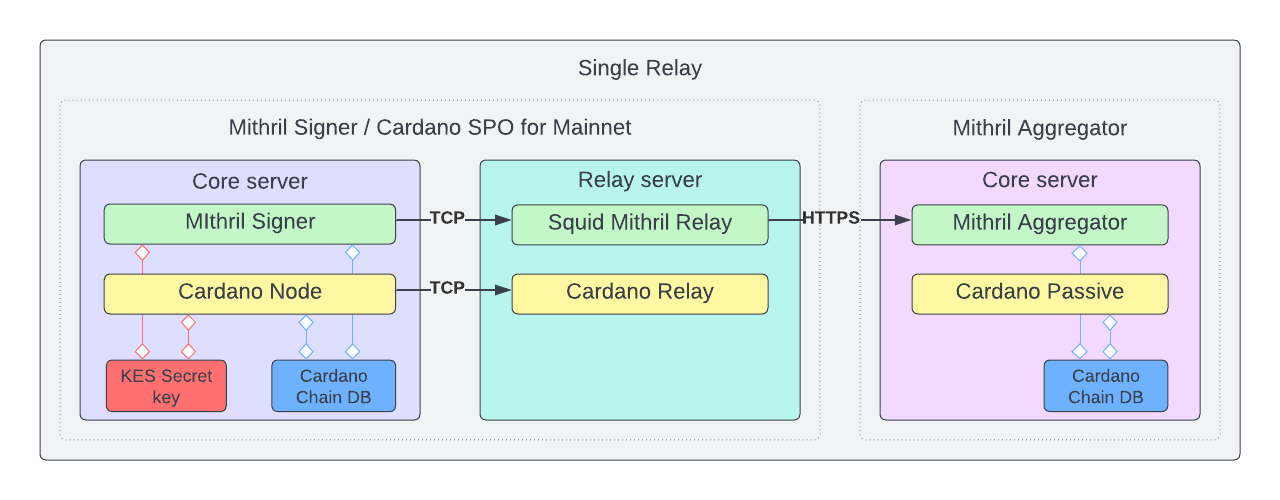
Single Relay Architecture⚓︎
For SPO's who only have a single Cardano relay node, an Squid based Mithril relay can be run on the same node as the Cardano relay. This can be used by the Mithril signer to submit the snapshot signatures to the Mithril Aggregator.
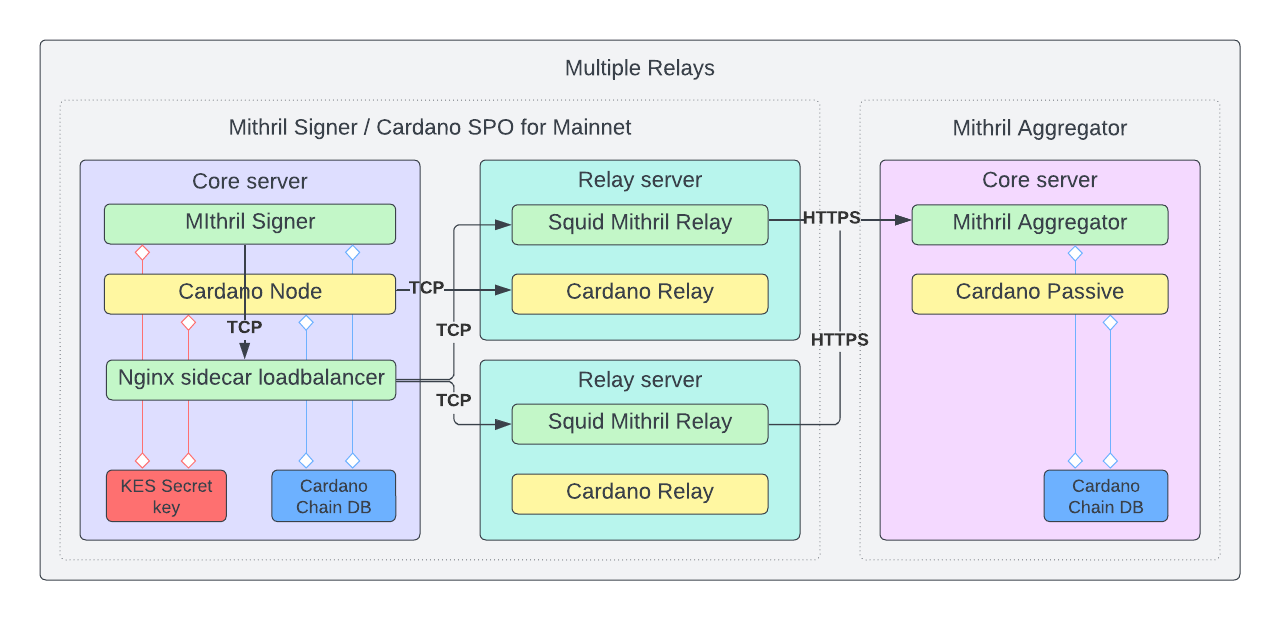
Multi Relay Architecture⚓︎
For SPO's who have multiple Cardano relay nodes, a Nginx relay sidecar can be run on the Block Producer and load balance requests over mutliple Cardano relay nodes, each running its own Nginx Mithril relay to pass the signature along to the Mithril aggregator. This can be used to avoid a single point of failure in case a Relay server is offline for any reason. This provides high availability for the Mithril signer through multiple relays as long as the local Nginx Mithril relay is running on the same server as the Cardano Block Producer node.
Installation⚓︎
The installation of the Mithril tools is automated via guild-deploy.sh. To participate
in a Mithril network include the -s m flag which will install the Mithril Client and
Mithril Signer release binaries to "${HOME}"/.local/bin.
guild-deploy.sh -s m
Bootstrapping a node using Mithril Client⚓︎
The Mithril client is used to download a snapshot of the Cardano blockchain from a Mithril Aggregator. The snapshot is then used to bootstrap a new Cardano node. The Mithril client can be used to download the latest snapshot, list all available snapshots, or show details of a specific snapshot.
To bootstrap a Cardano node using the Mithril client, follow these steps:
-
Setup the Cardano Node: Use the guild tools to setup the Cardano node, either by building the binaries or using pre-compiled binaries. Follow the instructions in the guild-operators documentation.
-
Create the Mithril environment file: Run the script with the
environment setupcommand. This will create a newmithril.envfile with all the necessary environment variables for the Mithril client.
./mithril-client.sh environment setup
-
Override a default variable in the Mithril environment file: Run the script with the environment override
command to override a default variable in the mithril.env file. ./mithril-client.sh environment override <VARIABLE> <VALUE> -
Download the latest Mithril snapshot: Once the environment file is set up, you can download the latest Mithril snapshot by running the script with the
snapshot
download
command. This snapshot contains the latest state of the Cardano blockchain db from a Mithril Aggregator.
./mithril-client.sh cardano-db download
- Download the Mithril snapshot without the ledger state (skip-ancillary): This option downloads only the immutable db files. The ledger state will be computed from the genesis block when the Cardano node starts, which results in a longer bootstrap time.
```bash ./mithril-client.sh cardano-db download skip-ancillary
Participating in Mithril Network⚓︎
The Mithril signer is used to participate in the creation of stake based signatures of snapshots. The Mithril signer can be used to sign a snapshots. The signed snapshot is then submitted to a Mithril Aggregator, via a Squid based Mithril Relay.
The first step to participate in the Mithril network is to deploy your Squid based Mithril Relays. The Mithril relay is used to provide a private and highly available network for submitting the snapshots to a Mithril Aggregator.
Deploying the Squid Mithril Relay⚓︎
To deploy your Squid based Mithril Relays with your Cardano relay node, follow these steps:
-
Deploy the Squid Mithril Relay: Run the
mithril-relay.shscript: -
Use the
-dflag to deploy the Squid Mithril Relay. - Provide the IP address of your Block Producer when prompted to secure the Mithril Relay to only accept traffic from your Block Producer.
- Optionally provide the relays listening port when prompted to use a port other than the default 3132, or just press enter to use the default.
- Create the appropriate firewall rule to allow traffic from your Block Producer to the Mithril Relay.
./mithril-relay.sh -d

Installing squid proxy
Enter the IP address of your Block Producer: 1.2.3.4
Enter the relays listening port (press Enter to use default 3132):
Using port 3132 for relays listening port.
Create the appropriate firewall rule: sudo ufw allow from 1.2.3.4 to any port 3132 proto tcp
- Enable the Systemd Squid Mithril Relay service to start on boot.
sudo systemctl enable --now squid
- Repeat the process for each of your Cardano relay nodes.
Deploying the Mithril Signer⚓︎
Mithril Signer with Single Relay⚓︎
-
Deploy the Mithril Signer: Run the
mithril-signer.shscript: -
Use the
-eflag to update themithril.envfile with the Mithril Signer environment variables. - Provide the IP address of your Mithril Relay when prompted.
-
Optionally provide the relays listening port when prompted to use a port.
./mithril-signer.sh -e Enter the IP address of the relay endpoint: 4.5.6.7 Enter the port of the relay endpoint (press Enter to use default 3132): Using RELAY_ENDPOINT=4.5.6.7:3132 for the Mithril signer relay endpoint. -
Use the
-dflag to deploy the Mithril Signer../mithril-signer.sh -d Creating cnode-mithril-signer systemd service environment file.. Mithril signer service successfully deployed -
Enable the Systemd service to start the Mithril Signer on boot.
sudo systemctl enable cnode-mithril-signer
Mithril Signer with Multi Relay⚓︎
-
Deploy the Nginx sidecar loadbalancer: Run the
mithril-relay.shscript: -
Use the
-lflag to deploy the Nginx Mithril Relay. - Provide the IP address of your Mithril Relay(s) when prompted.
- Provide an IP address for your nginx loadbalancer (default 127.0.0.1)
- Optionally provide the relays listening port when prompted to use a port other than the default 3132, or just press enter to use the default.
-
Create the appropriate firewall rule to allow traffic from your Block Producer to the Mithril Relay(s).
./mithril-relay.sh -l Installing nginx load balancer Enter the IP address of a relay: 4.5.6.7 Are there more relays? (y/n) y Enter the IP address of a relay: 8.9.10.11 Are there more relays? (y/n) n Enter the IP address of the load balancer (press Enter to use default 127.0.0.1): Using IP address 127.0.0.1 for the load balancer configuration. Enter the relays listening port (press Enter to use default 3132): Using port 3132 for relays listening port. Starting Mithril relay sidecar (nginx load balancer) -
Enable the Systemd Nginx Mithril Relay service to start on boot.
sudo systemctl enable --now nginx -
Deploy the Mithril Signer: Run the
mithril-signer.shscript: -
Use the
-eflag to update themithril.envfile with the Mithril Signer environment variables. - Provide the IP address of your nginx loadbalancer when prompted.
-
Optionally provide the loadbalancer listening port when prompted to use a port.
./mithril-signer.sh -e Enter the IP address of the relay endpoint: 127.0.0.1 Enter the port of the relay endpoint (press Enter to use default 3132): Using RELAY_ENDPOINT=127.0.0.1:3132 for the Mithril signer relay endpoint. -
Use the
-dflag to deploy the Mithril Signer../mithril-signer.sh -d Creating cnode-mithril-signer systemd service environment file.. Mithril signer service successfully deployed -
Enable the Systemd service to start the Mithril Signer on boot.
sudo systemctl enable cnode-mithril-signer